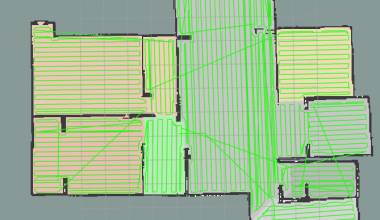
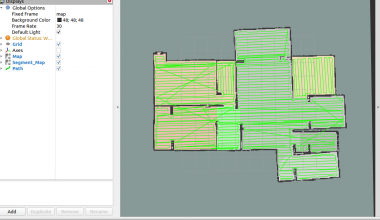
前置文章1:房屋区域分割算法 Morphological Segmentation
前置文章2:牛耕覆盖算法 Boustrophedon Coverage Path Planning
项目地址:ipa320 / ipa_coverage_planning
由于博主先找的是覆盖然后再找分区,所以针对的是ipa_coverage_planning项目进行研究,不排除有其他更好的方法或者已经优化过的方法,在后续的学习中会持续补充。由于本文章在wordpress中编辑,部分代码粘贴会出现bug,所以建议下载原项目看
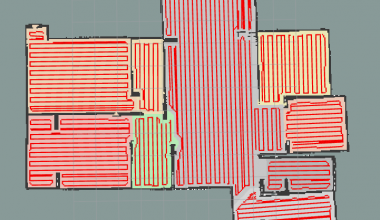
在上文中,我们将形态学分割和牛耕规划程序进行合并,将分割后的各个房间进行顺序规划,每个房间的规划用A*连接在一起。在本篇章中,我将着重对代码进行分析和调试,以及将多个用到的库进行剪切合并。
Part 1. morphological segmentation 形态学分割
源码:
void MorphologicalSegmentation::segmentMap(const cv::Mat& map_to_be_labeled, cv::Mat& segmented_map, double map_resolution_from_subscription,
        double room_area_factor_lower_limit, double room_area_factor_upper_limit)
{
	/*This segmentation algorithm does:
	 * 1. collect the map data
	 * 2. erode the map to extract contours
	 * 3. find the extracted contures and save them if they fullfill the room-area criterion
	 * 4. draw and fill the saved contoures in a clone of the map from 1. with a random colour
	 * 5. get the obstacle information from the original map and draw them in the clone from 4.
	 * 6. spread the coloured regions to the white Pixels
	 */

	//make two map clones to work with
	cv::Mat temporary_map_to_find_rooms = map_to_be_labeled.clone(); //map to find the rooms and for eroding
	//**************erode temporary_map until last possible room found****************
	//erode map a specified amount of times
        std::vector<std::vector<cv::Point>> saved_contours;//saving variable for every contour that is between the upper and the lower limit
	ROS_INFO("starting eroding");
	for (int counter = 0; counter < 73; counter++)
	{
		//erode the map one time
		cv::Mat eroded_map;
		cv::Point anchor(-1, -1); //needed for opencv erode
		cv::erode(temporary_map_to_find_rooms, eroded_map, cv::Mat(), anchor, 1);
		//save the more eroded map
		temporary_map_to_find_rooms = eroded_map;
		//Save the eroded map in a second map, which is used to find the contours. This is neccesarry, because
		//the function findContours changes the given map and would make it impossible to work any further with it
		cv::Mat contour_map = eroded_map.clone();
		//find Contours in the more eroded map
		std::vector < std::vector > temporary_contours; //temporary saving-variable
		//hierarchy saves if the contours are hole-contours:
		//hierarchy[{0,1,2,3}]={next contour (same level), previous contour (same level), child contour, parent contour}
		//child-contour = 1 if it has one, = -1 if not, same for parent_contour
		std::vector < cv::Vec4i > hierarchy;
#if CV_MAJOR_VERSION<=3
		cv::findContours(contour_map, temporary_contours, hierarchy, CV_RETR_CCOMP, CV_CHAIN_APPROX_SIMPLE);
#else
		cv::findContours(contour_map, temporary_contours, hierarchy, cv::RETR_CCOMP, cv::CHAIN_APPROX_SIMPLE);
#endif
		if (temporary_contours.size() != 0)
		{
			//check every contour if it fullfills the criteria of a room
			for (int current_contour = 0; current_contour < temporary_contours.size(); current_contour++) { //only take first level contours --> second level contours belong to holes and doesn't need to be looked at
				if (hierarchy[current_contour][3] == -1)
				{
					//check if contour is large/small enough for a room
					double room_area = map_resolution_from_subscription * map_resolution_from_subscription
					        * cv::contourArea(temporary_contours[current_contour]);
					//subtract the area from the hole contours inside the found contour, because the contour area grows extremly large if it is a closed loop
					for (int hole = 0; hole < temporary_contours.size(); hole++)
					{
						if (hierarchy[hole][3] == current_contour) //check if the parent of the hole is the current looked at contour
						{
							room_area -= map_resolution_from_subscription * map_resolution_from_subscription
									* cv::contourArea(temporary_contours[hole]);
						}
					}
					if (room_area_factor_lower_limit < room_area && room_area < room_area_factor_upper_limit) { //save contour for later drawing in map saved_contours.push_back(temporary_contours[current_contour]); //make region black if room found --> region doesn't need to be looked at anymore
#if CV_MAJOR_VERSION<=3
						cv::drawContours(temporary_map_to_find_rooms, temporary_contours, current_contour, cv::Scalar(0), CV_FILLED, 8, hierarchy, 2);
#else
						cv::drawContours(temporary_map_to_find_rooms, temporary_contours, current_contour, cv::Scalar(0), cv::FILLED, 8, hierarchy, 2);
#endif
					}
				}
			}
		}
	}
	//*******************draw contures in new map***********************
	std::cout << "Segmentation Found " << saved_contours.size() << " rooms." << std::endl;
	//draw filled contoures in new_map_to_draw_contours_ with random colour if this colour hasn't been used yet
	cv::Mat new_map_to_draw_contours; //map for drawing the found contours
	map_to_be_labeled.convertTo(segmented_map, CV_32SC1, 256, 0);
	std::vector < cv::Scalar > already_used_coloures; //vector for saving the already used coloures
	for (int idx = 0; idx < saved_contours.size(); idx++) { bool drawn = false; //checking-variable if contour has been drawn int draw_counter = 0; //counter to exit loop if it gets into an endless-loop (e.g. when there are more rooms than possible) do { draw_counter++; cv::Scalar fill_colour(rand() % 52224 + 13056); if (!contains(already_used_coloures, fill_colour) || draw_counter > 250)
			{
				//if colour is unique draw Contour in map
#if CV_MAJOR_VERSION<=3
				cv::drawContours(segmented_map, saved_contours, idx, fill_colour, CV_FILLED);
#else
				cv::drawContours(segmented_map, saved_contours, idx, fill_colour, cv::FILLED);
#endif
				already_used_coloures.push_back(fill_colour); //add colour to used coloures
				drawn = true;
			}
		} while (!drawn);
	}
	//*************************obstacles***********************
	//get obstacle informations and draw them into the new map
	ROS_INFO("starting getting obstacle information");
	for (int row = 0; row < map_to_be_labeled.rows; ++row)
	{
		for (int col = 0; col < map_to_be_labeled.cols; ++col)
		{
			//find obstacles = black pixels
			if (map_to_be_labeled.at(row, col) == 0)
			{
				segmented_map.at(row, col) = 0;
			}
		}
	}
	ROS_INFO("drawn obstacles in map");
	//**************spread the colored region by making white pixel around a contour their color****************
	//spread the coloured regions to the white Pixels
	wavefrontRegionGrowing(segmented_map);
	ROS_INFO("filled white pixels in new map");

}
整个算法分为6步操作(差不多吧,自己按感觉分的),下面将逐步进行测试和解析。
Step 1. 腐蚀地图
ROS_INFO("started Testing");
cv::Mat Mattemporary_map_to_find_rooms_test = temporary_map_to_find_rooms.clone();
size_t test_times = 1;
for (int counter = 0; counter < test_times; counter++)
{
	cv::Mat eroded_map_test;
	cv::Point anchor_test(-1, -1);
	cv::erode(Mattemporary_map_to_find_rooms_test, eroded_map_test, cv::Mat(), anchor_test, 1);

	Mattemporary_map_to_find_rooms_test = eroded_map_test;
}
cv::imshow("Mattemporary_map_to_find_rooms_test",Mattemporary_map_to_find_rooms_test);
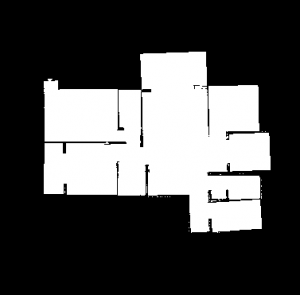
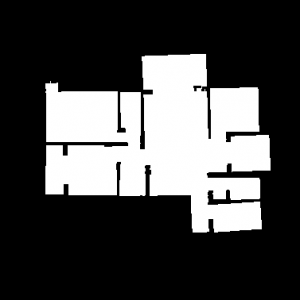
创建一些测试的数据,腐蚀 test_times 次看看腐蚀的到的效果是什么样的(由于很多像我一样平时用不到opencv,所以慢一点来看),从下图中我们可以看出来,腐蚀后黑色区域向外/内蔓延了,图左为原图,图右为腐蚀一次的图(这也是常用的保证安全距离的方式)
Step2. 提取轮廓
// find Contours in map
cv::Mat contour_map_test = Mattemporary_map_to_find_rooms_test.clone();
std::vector<std::vector<cv::Point>> temporary_contours_test;
std::vector<cv::Vec4i> hierarchy_test;
cv::findContours(contour_map_test, temporary_contours_test, hierarchy_test, cv::RETR_CCOMP, cv::CHAIN_APPROX_SIMPLE);
// display
cv::Mat display_map = cv::Mat::ones(temporary_map_to_find_rooms.size(), temporary_map_to_find_rooms.type()) * 255;
cv::drawContours(display_map, temporary_contours_test, -1, cv::Scalar(0, 0, 0), 1);
cv::imshow("Contours", display_map);
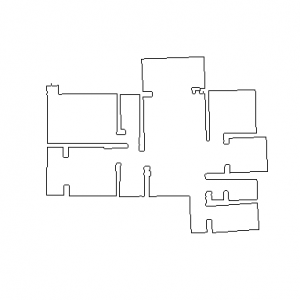
可能很多人和我一样对于轮廓提取这一部分没有直观的认知。使用opencv的findContours进行轮廓提取,得到的是二维的Point点集,将其在空白图像上可视化,操作对应于上述代码,左图为腐蚀一次后的图,右图为提取的轮廓:

在这一部分比较难理解的是 hierarchy ,我在这里借助GPT解释一下:
hierarchy是一个向量,用于存储轮廓的层次结构信息。在OpenCV中,轮廓可以有不同的层次关系,例如,一个轮廓可能是另一个轮廓的子轮廓(内部轮廓),或者两个轮廓可能是平行的(同一层级)。hierarchy向量中的每个元素都是一个cv::Vec4i类型,包含四个整数,分别表示:
- Next Contour (同一层级的下一个轮廓):这个值指向同一层级的下一个轮廓。如果没有下一个轮廓,则为-1。
- Previous Contour (同一层级的上一个轮廓):这个值指向同一层级的上一个轮廓。如果没有上一个轮廓,则为-1。
- First Child (第一个子轮廓):这个值指向当前轮廓的第一个子轮廓。如果当前轮廓没有子轮廓,则为-1。
- Parent Contour (父轮廓):这个值指向当前轮廓的父轮廓。如果当前轮廓没有父轮廓,则为-1。
通过这种方式,
hierarchy向量提供了一种方法来理解和操作图像中轮廓之间的复杂关系。例如,你可以使用这些信息来区分和处理图像中的主要物体和它们的内部空洞,或者来识别和分离相邻但独立的物体。
我们尝试输出一下 temporary_contours :
for (size_t i = 0; i < hierarchy_test.size(); ++i) {
	std::cout << "Hierarchy " << i << ": ";
	for (int j = 0; j < 4; ++j) {
		std::cout << hierarchy_test[i][j] << " ";
	}
	std::cout << std::endl;
}
结果为:
Hierarchy 0: -1 -1 1 -1
Hierarchy 1: -1 -1 -1 0
根据上述结果,可以看到检测出两个轮廓,轮廓1是父轮廓,轮廓2是子轮廓其父轮廓是轮廓1(大概是图中的那个小轮廓吧)
Step3. 寻找房间
if (temporary_contours_test.size() != 0)
{
	for (int current_contour = 0; current_contour < temporary_contours_test.size(); current_contour++)
	{
		if (hierarchy_test[current_contour][3] == -1)
		{
			double room_area = map_resolution_from_subscription * map_resolution_from_subscription * cv::contourArea(temporary_contours_test[current_contour]);
			for (int hole = 0; hole < temporary_contours_test.size(); hole++)
				if (hierarchy_test[hole][3] == current_contour)
					room_area -= map_resolution_from_subscription * map_resolution_from_subscription * cv::contourArea(temporary_contours_test[hole]);
			if (room_area_factor_lower_limit < room_area && room_area < room_area_factor_upper_limit)
			{
				saved_contours.push_back(temporary_contours_test[current_contour]);
				cv::drawContours(Mattemporary_map_to_find_rooms_test, temporary_contours_test, current_contour, cv::Scalar(0), cv::FILLED, 8, hierarchy_test, 2);
			}
		}
	}
}
根据轮廓找房间的逻辑大概对应于上述代码的几个步骤:
- 1. 遍历每一个父轮廓,利用OpenCV的 contourArea 函数计算该轮廓的面积
- 2. 删除父轮廓中的子轮廓的面积(障碍物)
- 3. 如果除去子轮廓的面积符合开始设定的面积范围,将该轮廓保存在数组中,将地图中该轮廓范围填充(置为不可到达)
由于腐蚀 1 次无法看到效果,我们尝试多次腐蚀然后找一个房间,将腐蚀次数变为7,查看效果,左上为原图,右上为腐蚀5次,左下为提取的轮廓,右下为填充查找到房间后的地图:
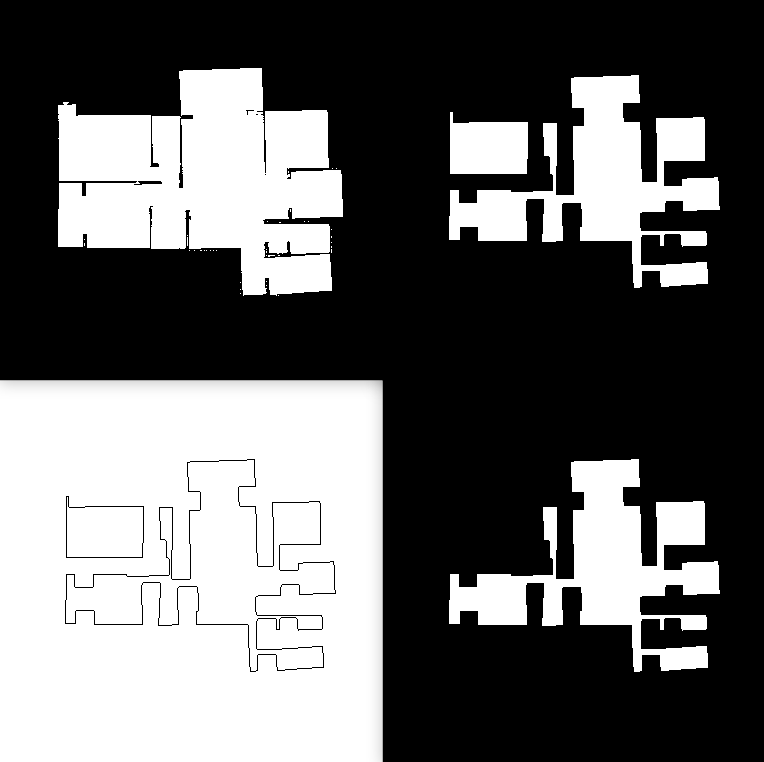
可以看到经过五次腐蚀,左上的房间独立了出来,且轮廓的面积达到了房间面积的要求,将该轮廓记录,并清除该房间。随后用右下的地图继续查找。
Step4. 回到Step1重复腐蚀并查找
执行腐蚀的次数是认为设定的,源码中设定了73次,我认为实际可能不需要这么多次,不过多执行几次并没有坏处
Step5. 填充轮廓
map_to_be_labeled.convertTo(segmented_map, CV_32SC1, 256, 0);
std::vector<cv::Scalar> already_used_coloures_test;
for (int idx = 0; idx < saved_contours.size(); idx++)
{
    bool drawn = false;   // checking-variable if contour has been drawn
    int draw_counter = 0; // counter to exit loop if it gets into an endless-loop (e.g. when there are more rooms than possible)
    do {
        draw_counter++;
        cv::Scalar fill_colour(rand() % 52224 + 13056);
        if (!contains(already_used_coloures_test, fill_colour) || draw_counter > 250){
            cv::drawContours(segmented_map, saved_contours, idx, fill_colour, cv::FILLED);
            already_used_coloures_test.push_back(fill_colour); // add colour to used coloures
            drawn = true;
        }
    } while (!drawn);
}
for (int row = 0; row < map_to_be_labeled.rows; ++row)
{
	for (int col = 0; col < map_to_be_labeled.cols; ++col)
	{
		if (map_to_be_labeled.at(row, col) == 0)
		{
			segmented_map.at(row, col) = 0;
		}
	}
}
cv::Mat display_map_test;
segmented_map.convertTo(display_map_test,CV_8U);

cv::imshow("filled", display_map_test);
对照上面的找到一个房间后填充,填充后补充原图中不可到达区域,效果如下图,虽然能看出这个房间,但是填充的并不满,所以有后续操作

step6. 扩散填充
wavefrontRegionGrowing(segmented_map);
这一步操作是将彩色区域填充至白色区域,调用了wavefront_region_growing.cpp的函数,详细看一下wavefrontRegionGrowing是怎么实现的
// spreading image is supposed to be of type CV_32SC1
void wavefrontRegionGrowing(cv::Mat& image)
{
	//This function spreads the colored regions of the given map to the neighboring white pixels
	if (image.type()!=CV_32SC1)
	{
		std::cout << "Error: wavefrontRegionGrowing: provided image is not of type CV_32SC1." << std::endl;
		return;
	}

	cv::Mat spreading_map = image.clone();
	bool finished = false;
	while (finished == false)
	{
		finished = true;
		for (int row = 1; row < spreading_map.rows-1; ++row)
		{
			for (int column = 1; column < spreading_map.cols-1; ++column)
			{
				if (spreading_map.at(row, column) > 65279)		// unassigned pixels
				{
					//check 3x3 area around white pixel for fillcolour, if filled Pixel around fill white pixel with that colour
					bool set_value = false;
					for (int row_counter = -1; row_counter <= 1 && set_value==false; ++row_counter)
					{
						for (int column_counter = -1; column_counter <= 1 && set_value==false; ++column_counter)
						{
							int value = image.at<int>(row + row_counter, column + column_counter);
							if (value != 0 && value <= 65279)
							{
								spreading_map.at<int>(row, column) = value;
								set_value = true;
								finished = false;	// keep on iterating the wavefront propagation until no more changes occur
							}
						}
					}
				}
			}
		}
		image = spreading_map.clone();
	}
}
该操作主要包含以下几个步骤:
- 检查输入数据类型,地图类型必须为CV_32SC1
- 遍历图像像素,如果像素未被分配(像素值大于 65279),则检查周围3*3范围
- 如果3*3范围内存在色彩像素,则设置为该值,set_value用于标记是否修改该像素的值
- 不停的进行着色,直到没有未被分配的色彩为止(finished = true)
最终完成区域的填充
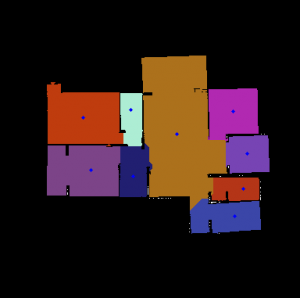
完整的房间分割后的图:

结尾总结:
至此,图像的分割完成了,但是这样的填充方法有缺陷,在得到的图中也可以很明显的看出来,由于填充顺序是从左上到右下遍历,所以房间可能会存在左边缺少右边突出的现象。思考一下优化方向:① 针对独立房间的方法,ipa项目中采用的是不断的腐蚀并提取轮廓,是否能够改进; ② 针对填充房间,ipa项目中采用的是对像素点周围3*3范围进行查找,是否能优化
